Documentation
Get Started with Agent Zero
Install, configure, and start using Agent Zero in minutes. Watch the walkthrough or follow the steps below.

How to Install Agent Zero
Agent Zero runs in a secure, isolated Docker container, which is the recommended and safest method for deployment. This makes installation simple and consistent across all platforms — Windows, macOS, and Linux.
Quick Install
Run a single command to install everything automatically:
The script handles Docker, configuration, and startup automatically.
Full Installation Guide
Step 1: Install Docker Desktop
Docker Desktop is free for personal use and required to run Agent Zero.
-
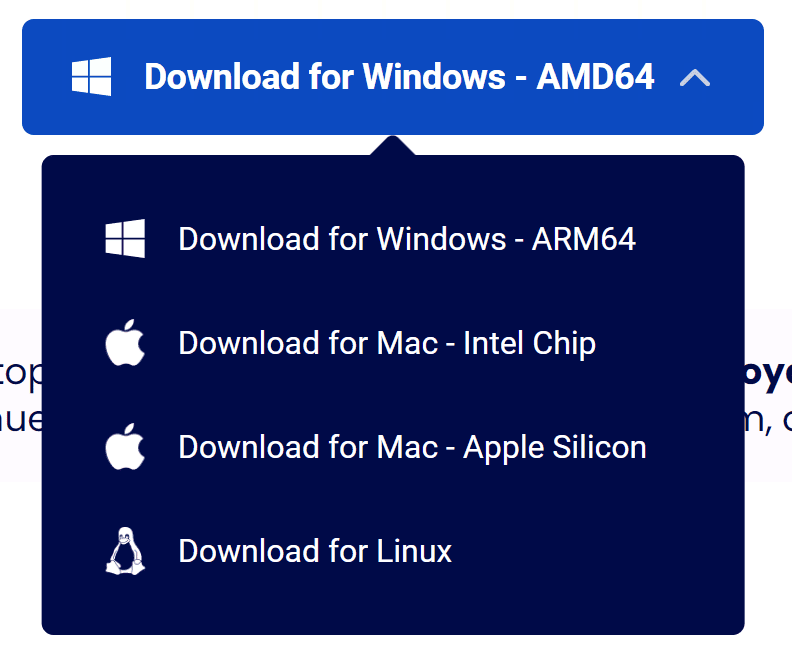
Download Docker Desktop: Visit docker.com and download Docker Desktop for Windows
-
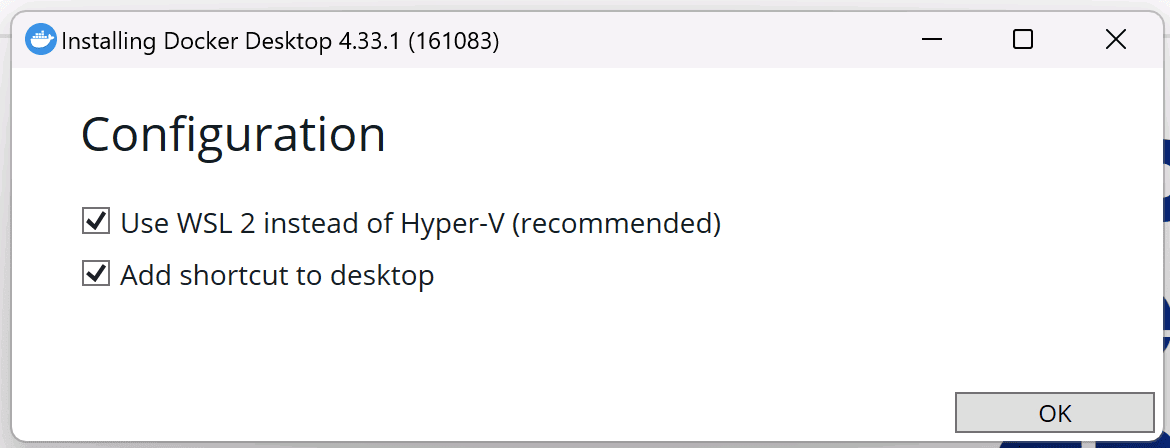
Run the installer: Double-click the downloaded file and follow the installation wizard with default settings
-
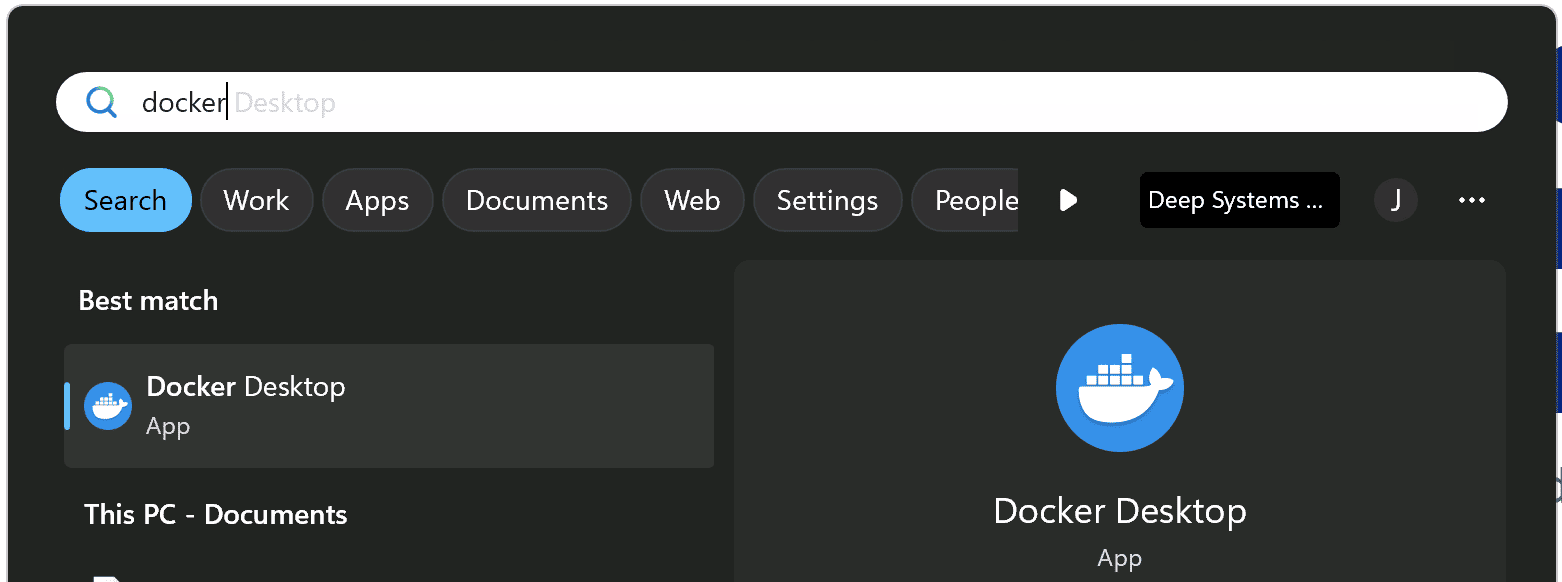
Launch Docker Desktop: After installation, start Docker Desktop from your Start menu
- Verify installation: Wait for Docker Desktop to fully start (you'll see the Docker icon in your system tray)
💡 Note: Docker Desktop on Windows requires WSL 2. The installer will set this up automatically if needed.
- Download Docker Desktop: Visit docker.com and download Docker Desktop for Mac (choose your chip: Intel or Apple Silicon)
-
Install the app: Open the downloaded .dmg file and drag Docker to your Applications folder
- Launch Docker Desktop: Open Docker from your Applications folder
-
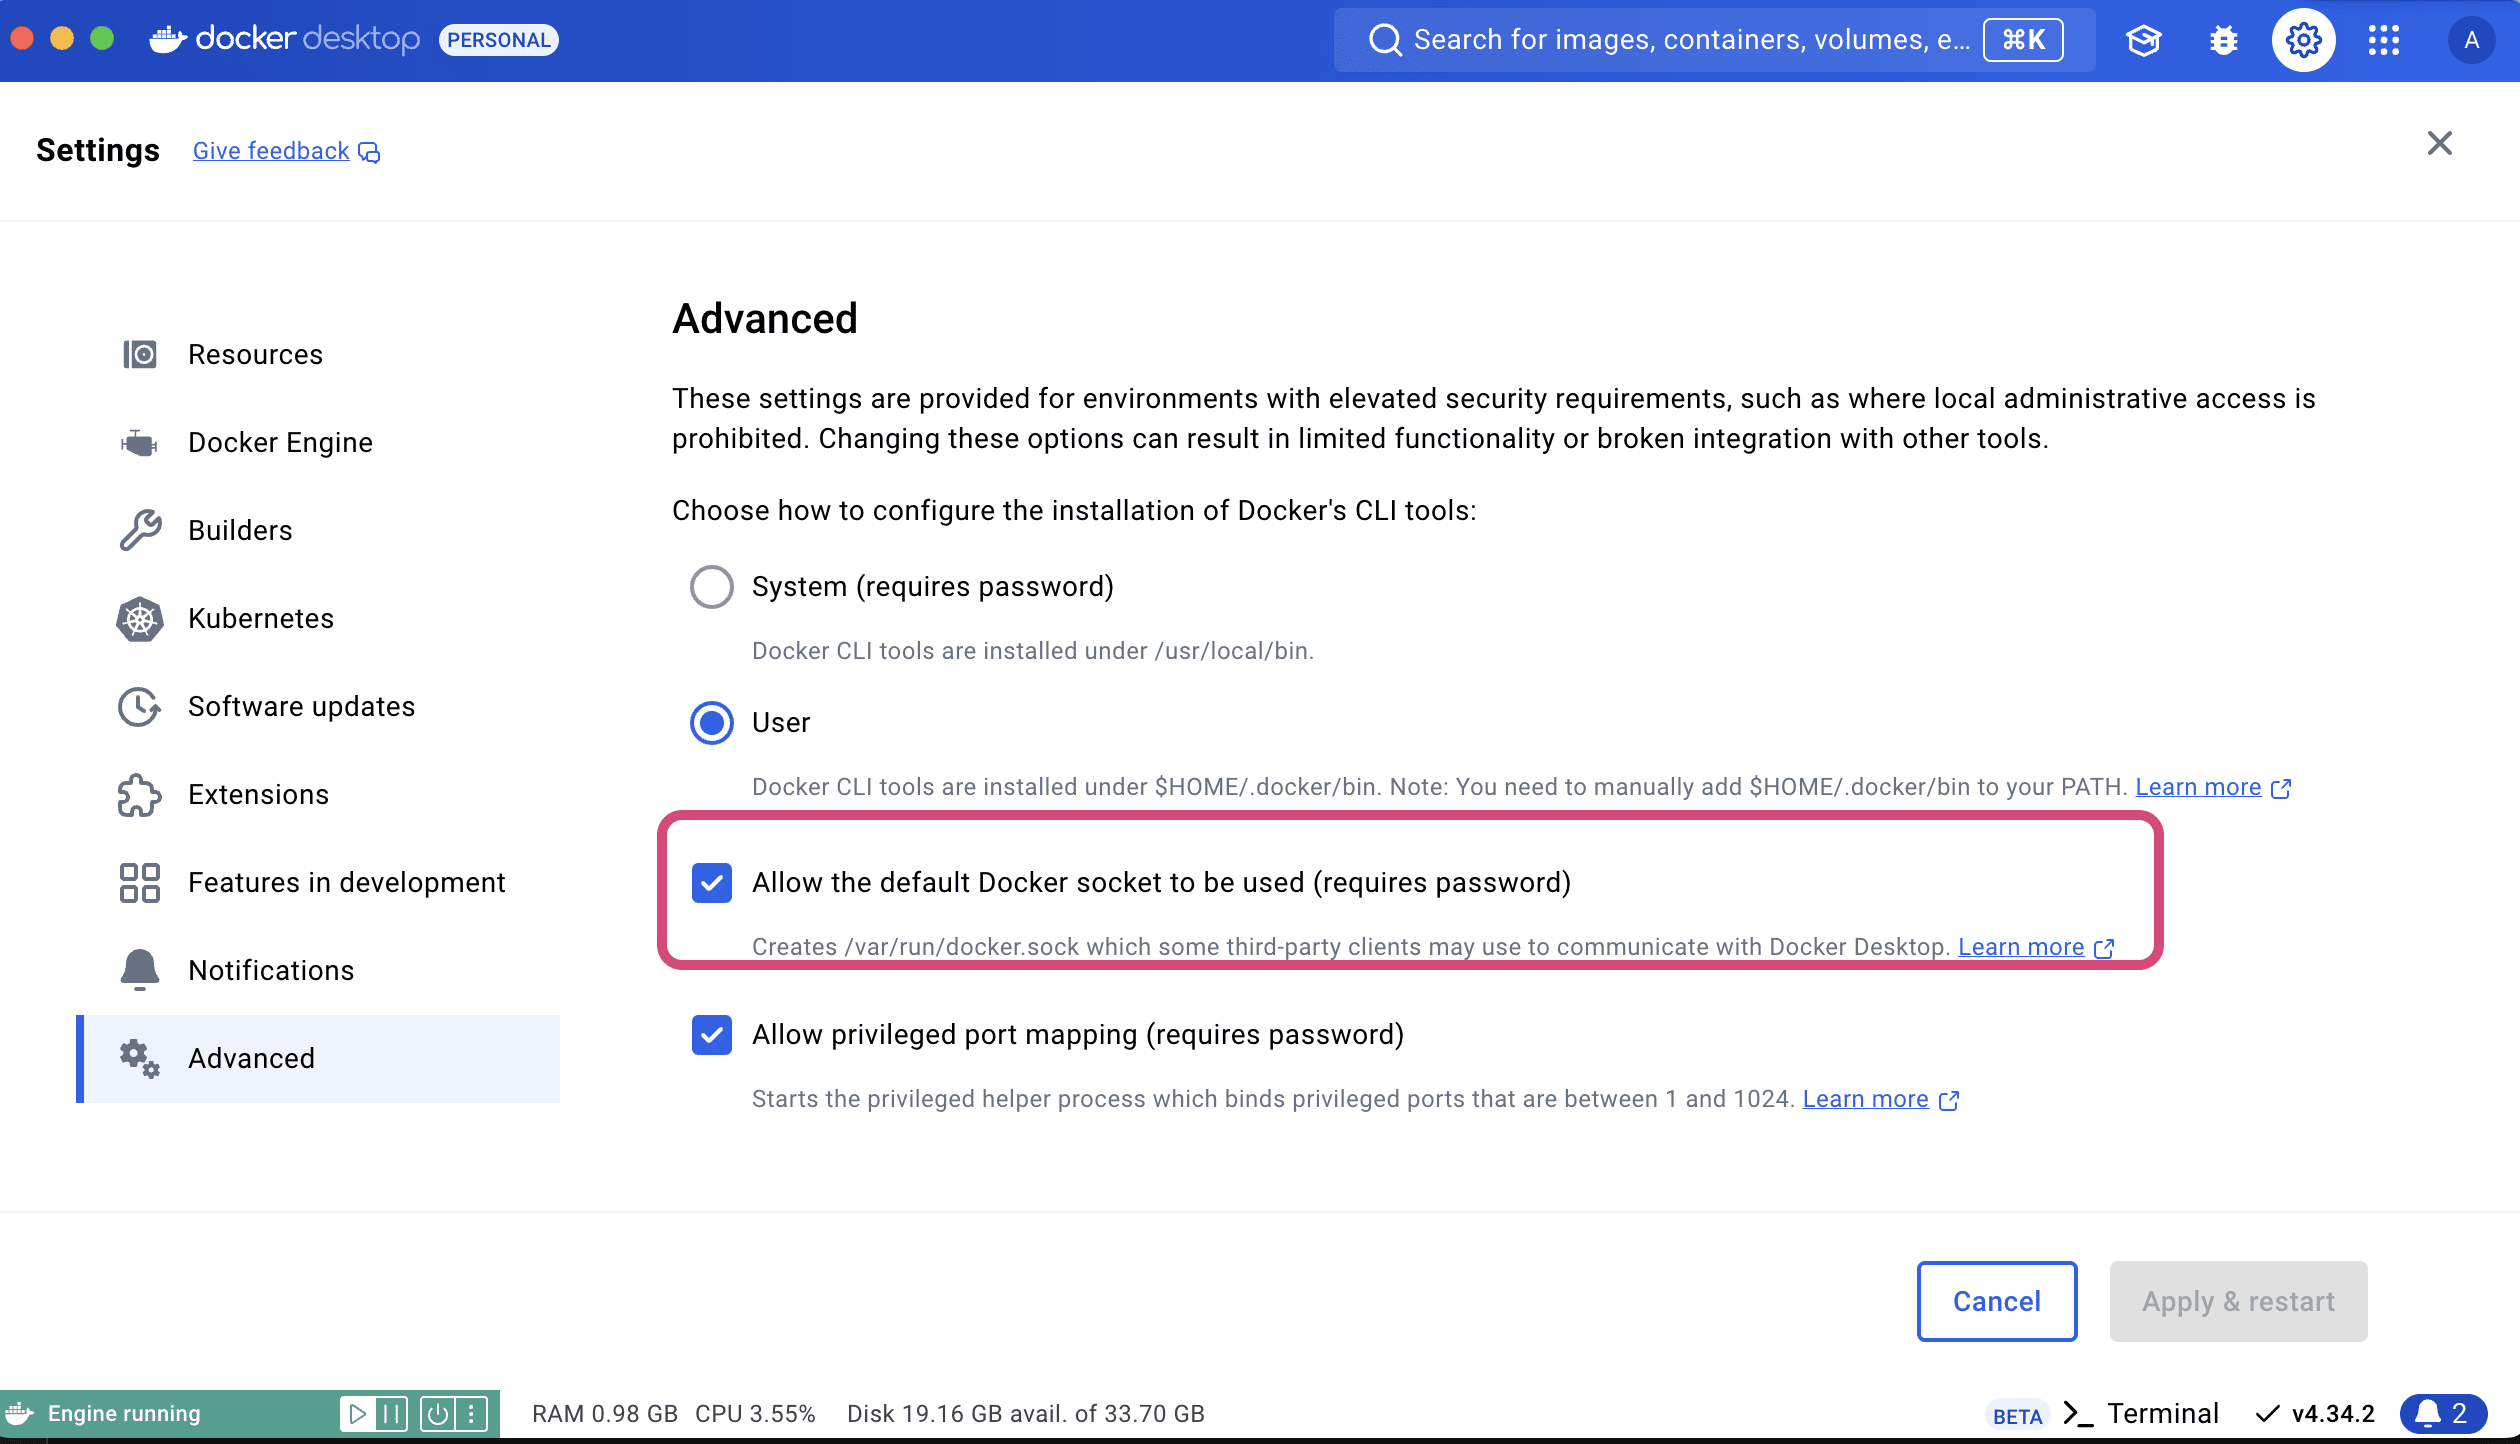
Configure socket (important!): On first launch, go to Settings → Advanced and ensure "Allow the default Docker socket to be used" is checked
💡 Note: Make sure to allow Docker file system access when prompted by macOS.
-
Install Docker CE: Use your package manager or follow the official Docker guide
# Ubuntu/Debian sudo apt-get update sudo apt-get install docker-ce docker-ce-cli containerd.io # Fedora sudo dnf install docker-ce docker-ce-cli containerd.io # Arch sudo pacman -S docker -
Add user to docker group: This allows running Docker without sudo
sudo usermod -aG docker $USER newgrp docker # Or log out and back in -
Start Docker service:
sudo systemctl start docker sudo systemctl enable docker # Start on boot -
Verify installation:
docker --version
docker ps  # Should run without errors
Step 2: Pull the Agent Zero Image
The Agent Zero Docker image contains a complete Linux system with all necessary software pre-installed. It's approximately 2GB to download and 4.5GB when extracted.
Option A: Using Docker Desktop (Recommended)
- Open Docker Desktop
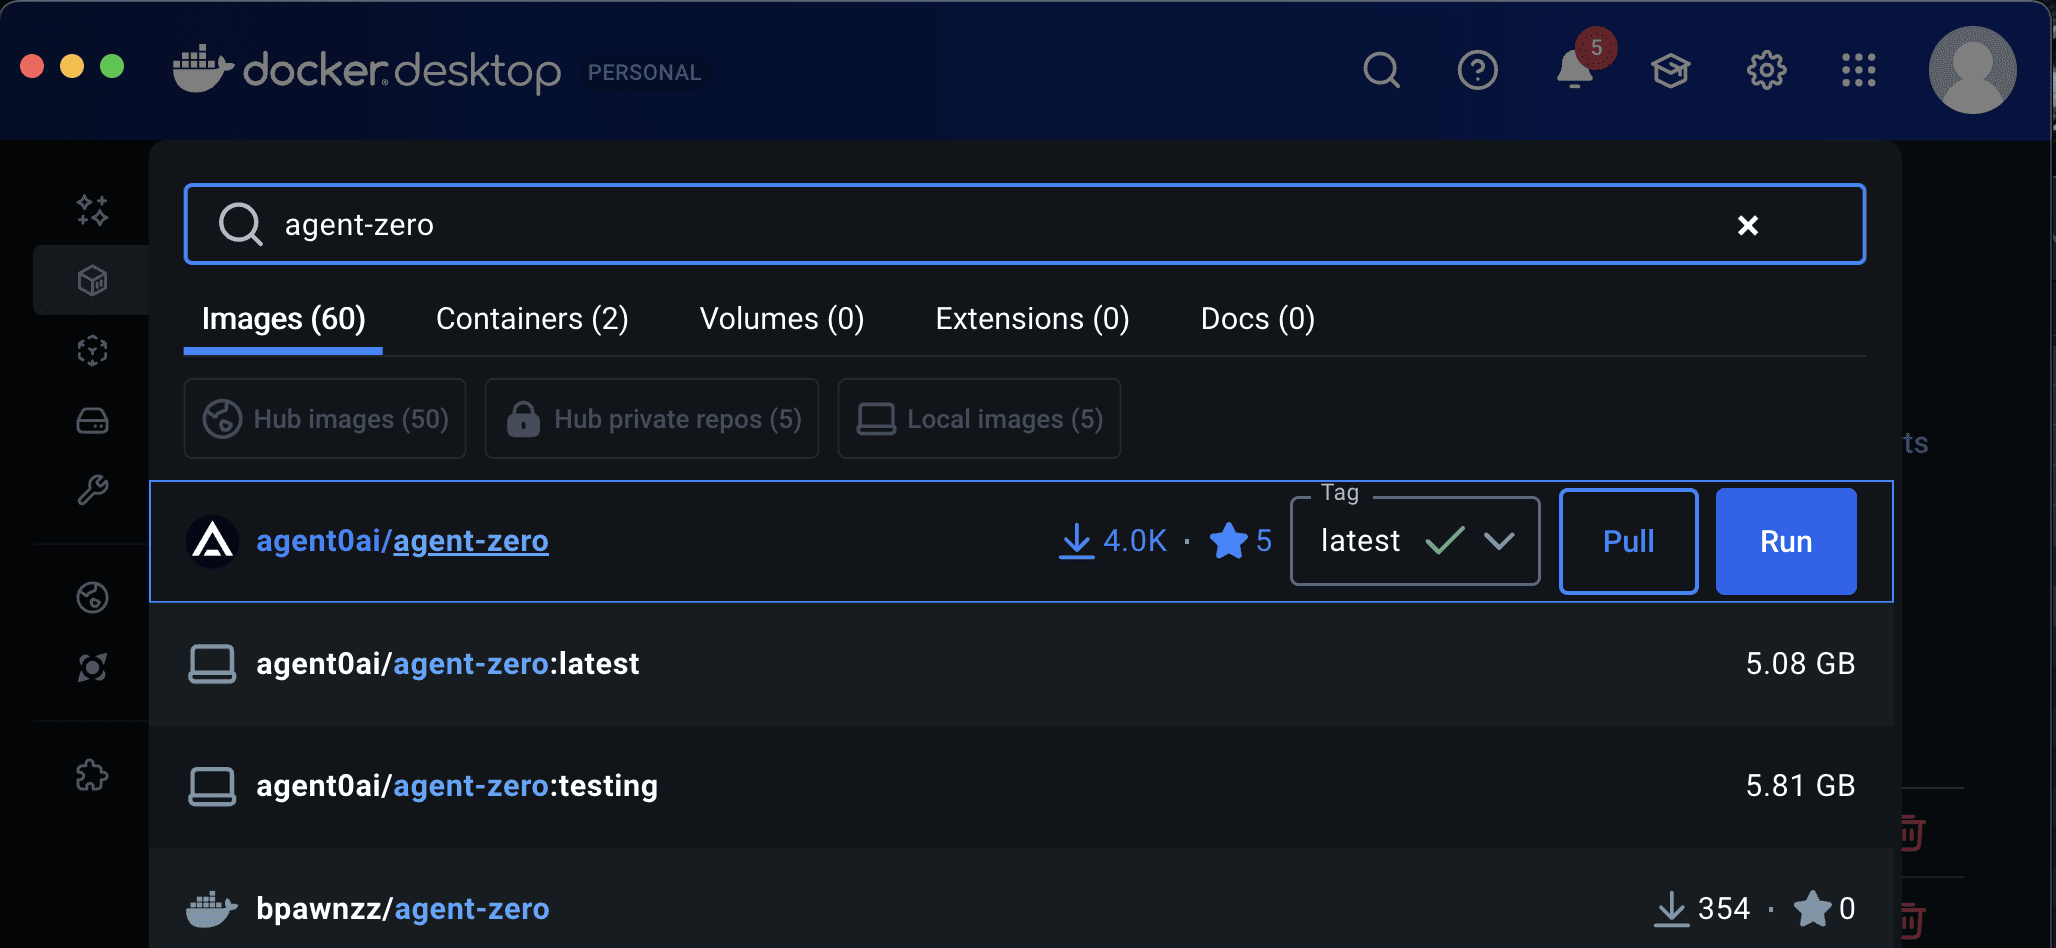
- Click on the search bar at the top
- Search for
agent0ai/agent-zero - Select the image (should show 10K+ downloads)
- Click "Pull" to download the latest version
Option B: Using Command Line
docker pull agent0ai/agent-zero:latestThe download will take a few minutes depending on your internet connection.
Step 3: Run Your Agent Zero Container
Docker images are blueprints; containers are running instances. You can run multiple independent Agent Zero containers from a single image if needed.
Option A: Using Docker Desktop (Recommended)
- Go to the "Images" tab in Docker Desktop
- Find
agent0ai/agent-zeroand click the "Run" button - Click "Optional settings" to expand configuration options
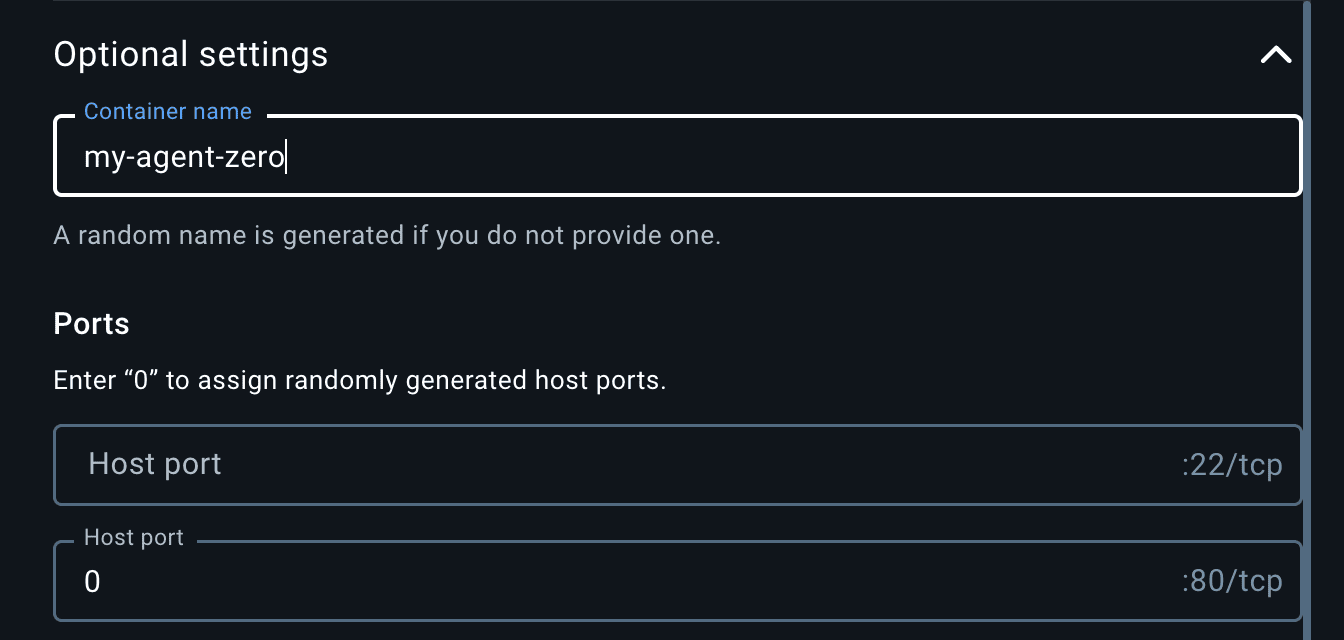
- Port mapping: In the "Ports" section, enter
0in the "Host port" field next to port 80Tip: Use0to let Docker assign a random port, or specify a port like50080 - (Optional) SSH access: Map the SSH port (22) to access the container's terminal
- (Optional) Data persistence: Map volumes to preserve data (see Data Persistence section below)
- Click "Run" to start the container
Option B: Using Command Line
# Basic run (ephemeral - data lost on container deletion)
docker run -d -p 50080:80 --name agent-zero agent0ai/agent-zero
# With data persistence (recommended)
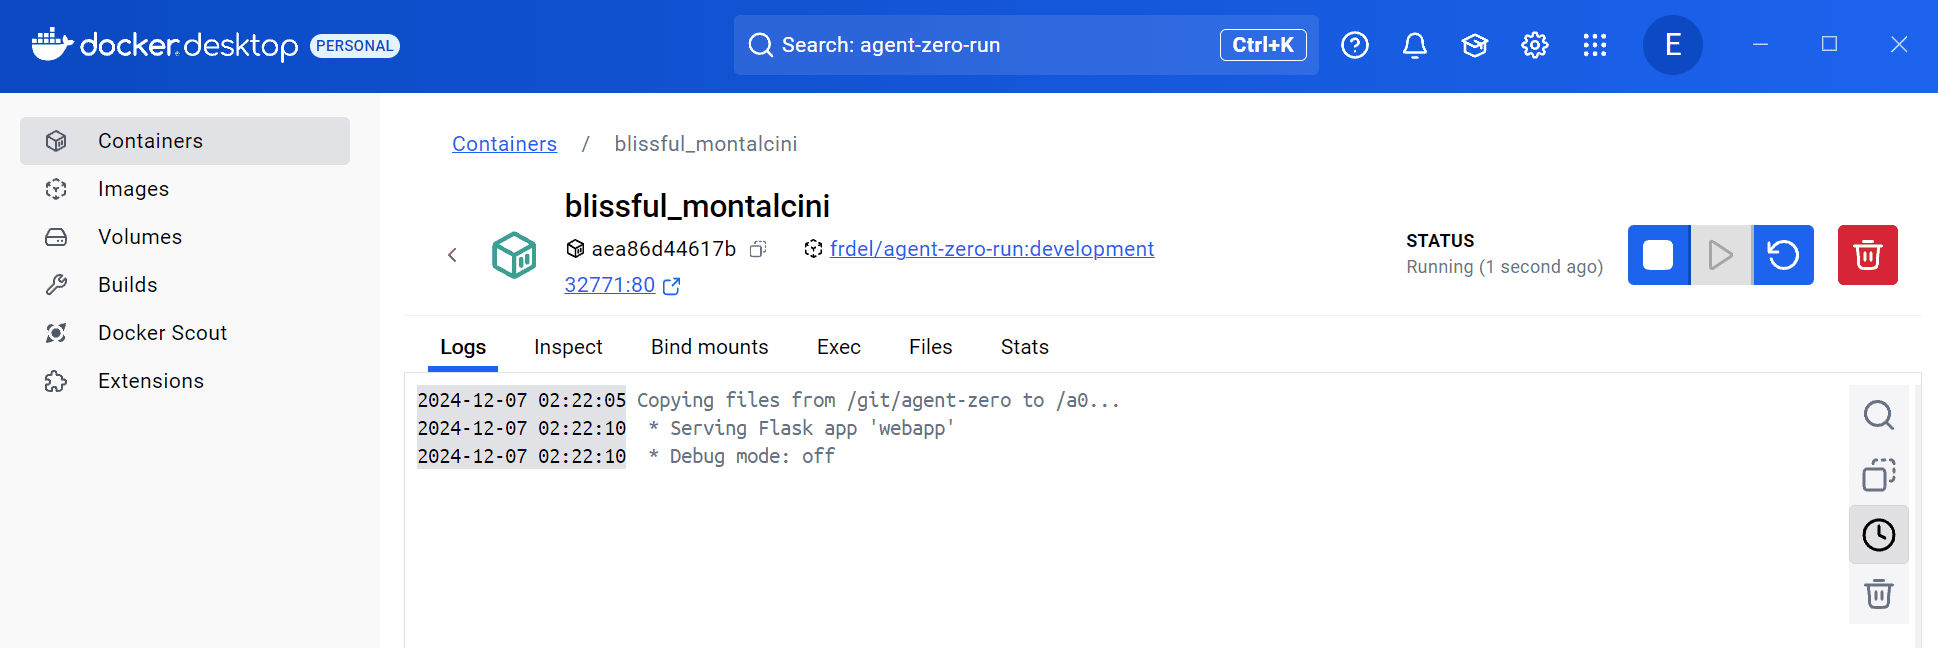
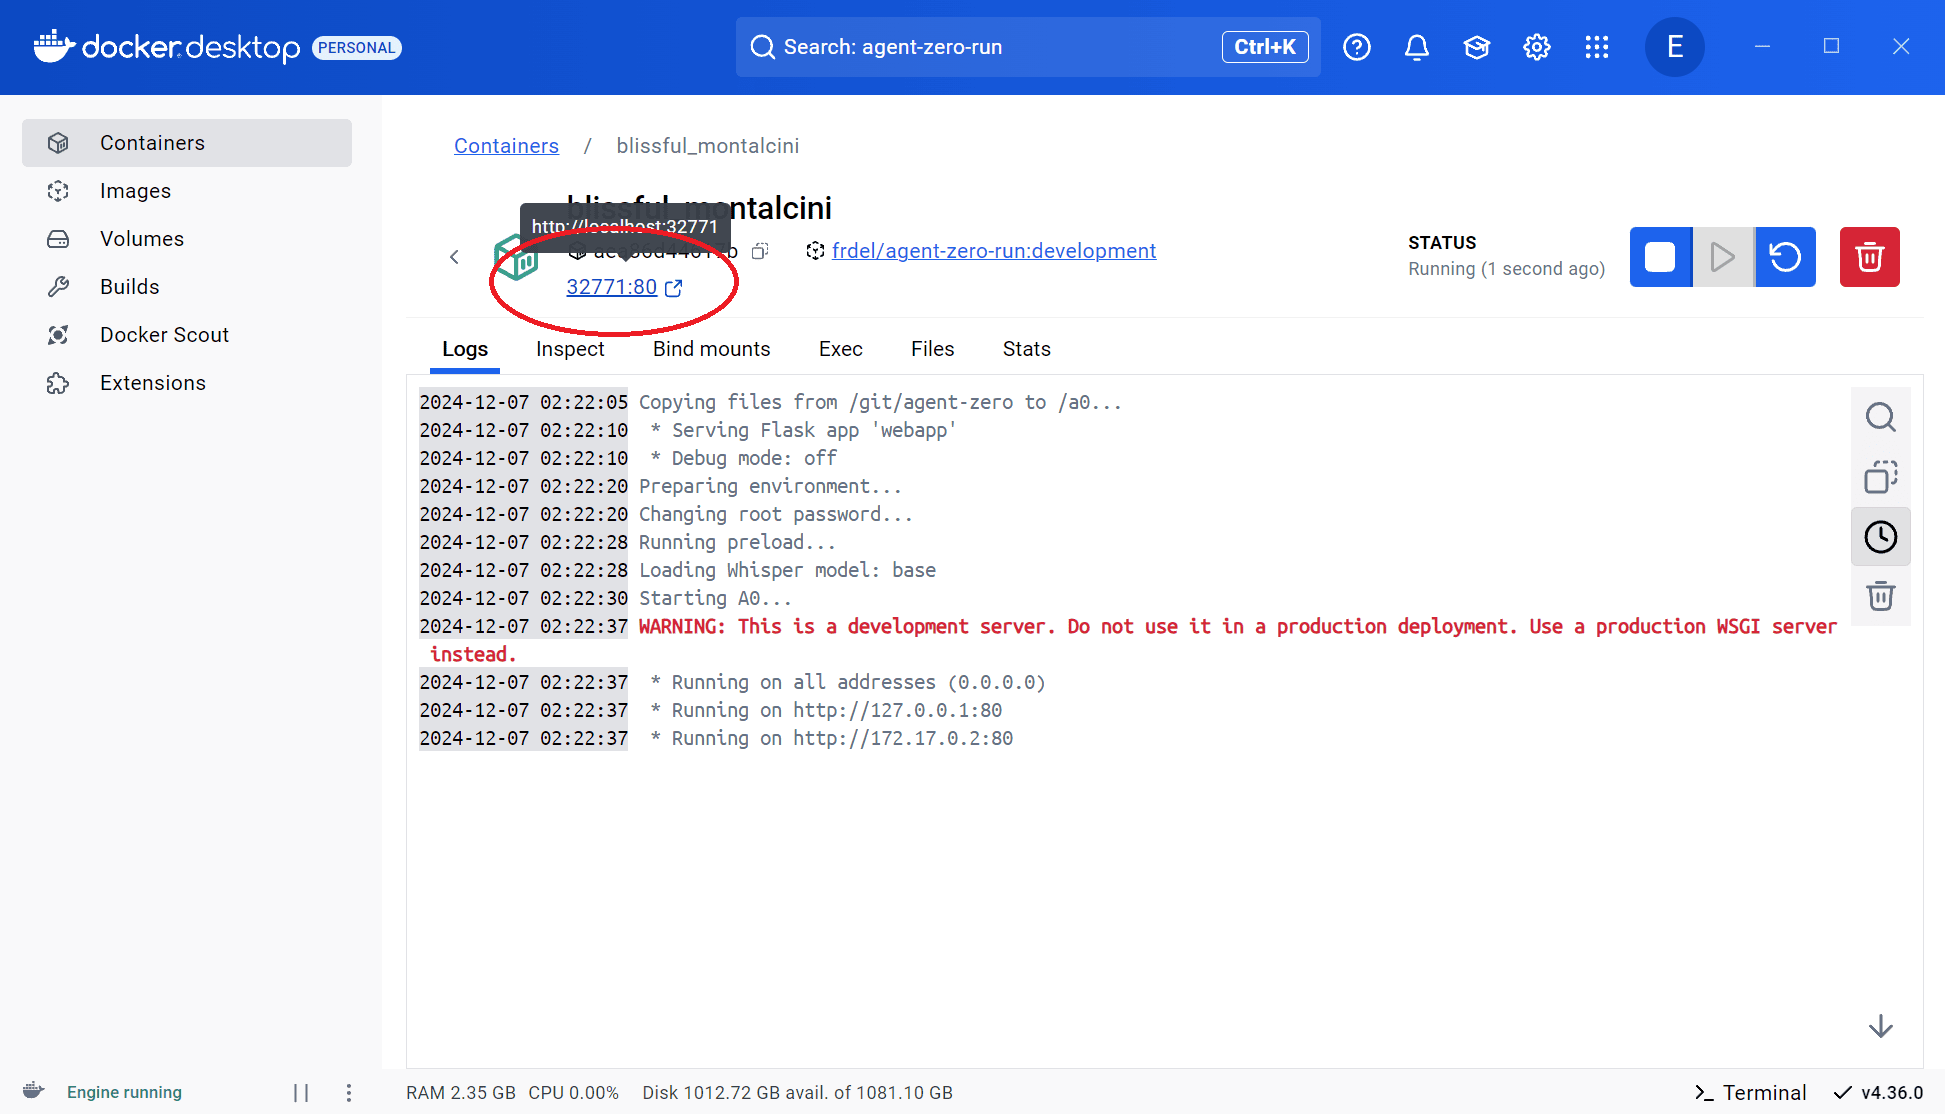
docker run -d -p 50080:80 -v /path/to/local/data:/a0/usr --name agent-zero agent0ai/agent-zeroThe container will start in a few seconds. You'll see a green "Running" status in Docker Desktop:
Step 4: Access the Web UI
Once the container is running, access Agent Zero through your web browser:
- Via Docker Desktop: Click on the port link shown in your container details
- Via Browser: Navigate to
http://localhost:<PORT>(e.g.,http://localhost:50080)
You should see the Agent Zero interface with a green status indicator:
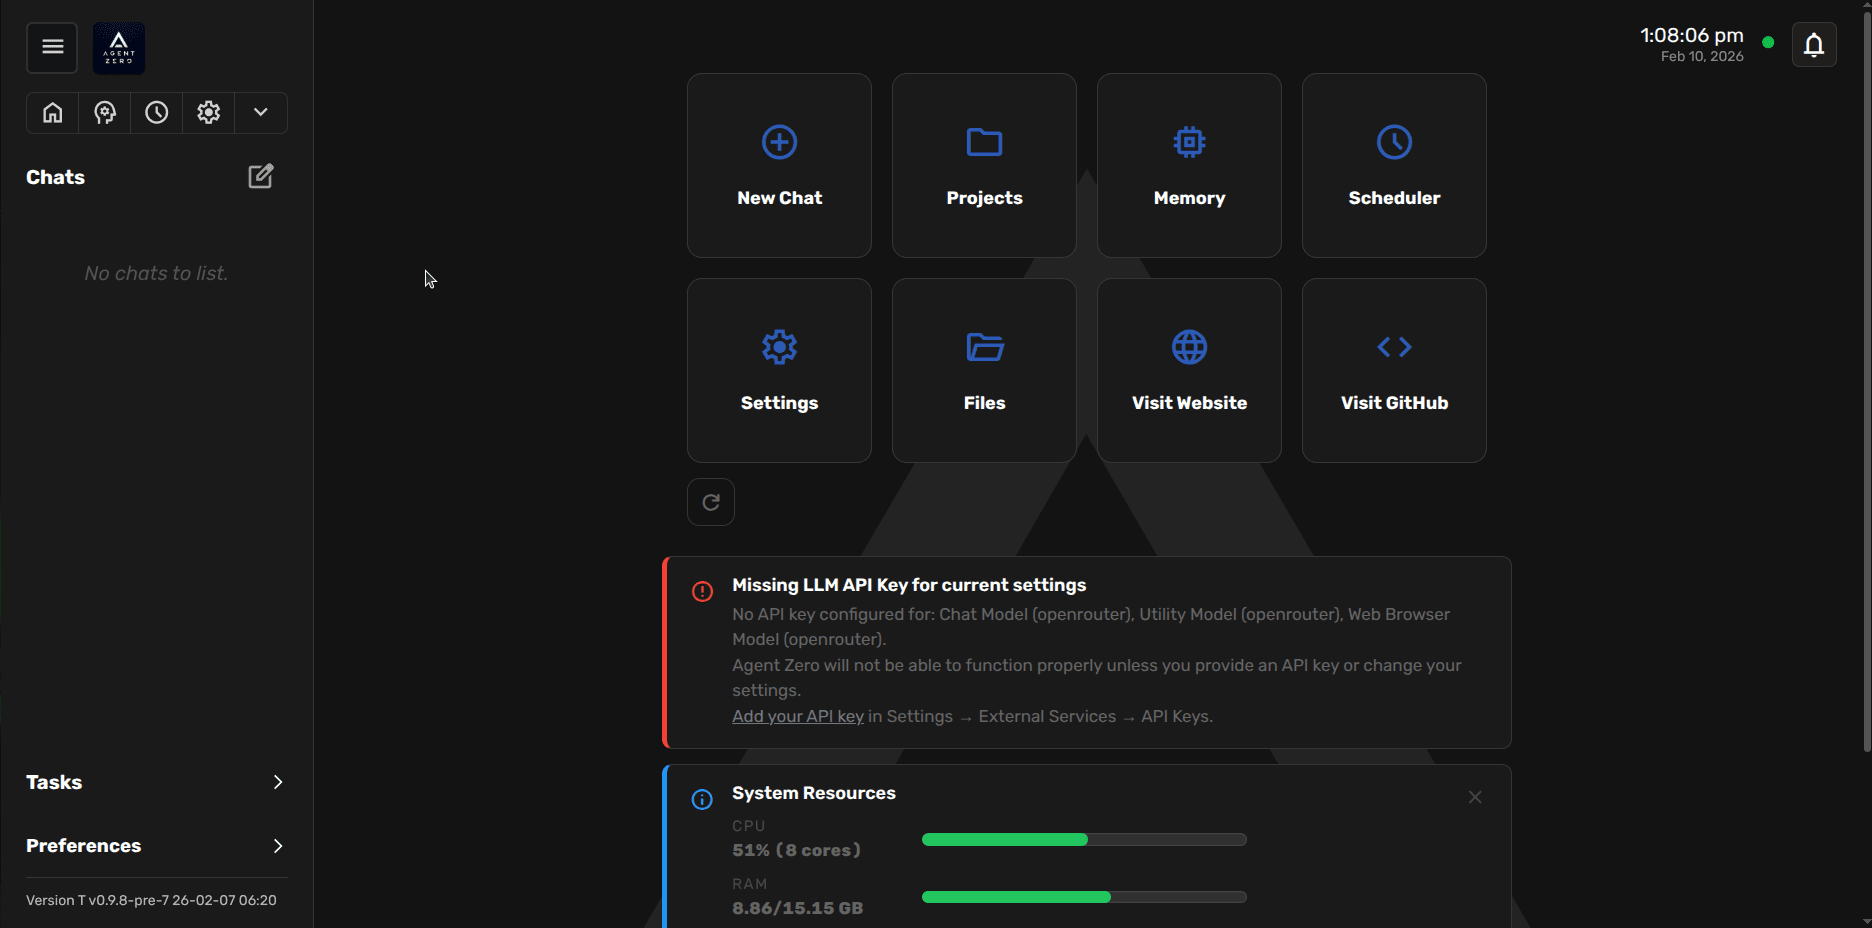
⚠️ Important: Configure Your AI Model
Agent Zero won't work until you configure an AI model provider. Continue to the next section to set this up.
How to Configure and Use Agent Zero
After installation, you need to configure Agent Zero with an AI model provider before you can start chatting. Click the "Settings" button in the web interface to access all configuration options.
Quick Start: Using OpenRouter
OpenRouter is configured as the default provider and requires minimal setup:
- Visit openrouter.ai and create an account
- Navigate to API Keys and create a new key
- Copy your API key
- From the 'Models' section of OpenRouter, choose one of the available free models
- In Agent Zero, click "Settings" → "External Services"
- Paste your key in "OpenRouter"
- Write the model names in the 'Chat Model', 'Utility Model' and 'Web Browser Model' fields
- Click "Save"
✅ Done! You're ready to start using Agent Zero. Try asking it a question in the chat interface.
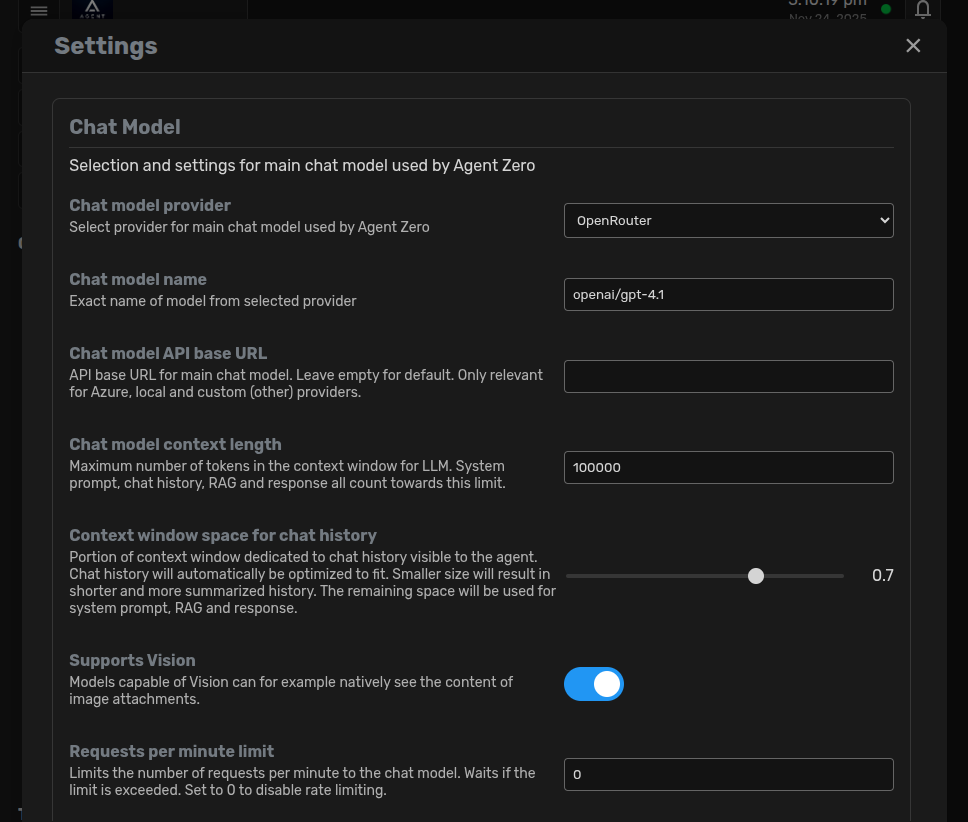
Understanding Model Configuration
Agent Zero uses different AI models for different purposes. Each can be configured independently:
Chat Model (Main Brain)
- Primary model that handles conversations and complex reasoning
- Configure in: Settings → Agent Settings → Chat Model
- Recommended: gpt-4.1 for quality and cost efficiency
Utility Model (Helper Model)
- Smaller, faster model for internal tasks like memory organization and summarization
- Can use the same provider as chat model or a cheaper/faster alternative
- Recommended: gpt-4.1 for quality and cost efficiency
Embedding Model (Memory System)
- Generates embeddings for Agent Zero's memory and knowledge base
- Note: Changing this will re-index all memories (can take time)
- Recommended: Use the default light-weight embedding model
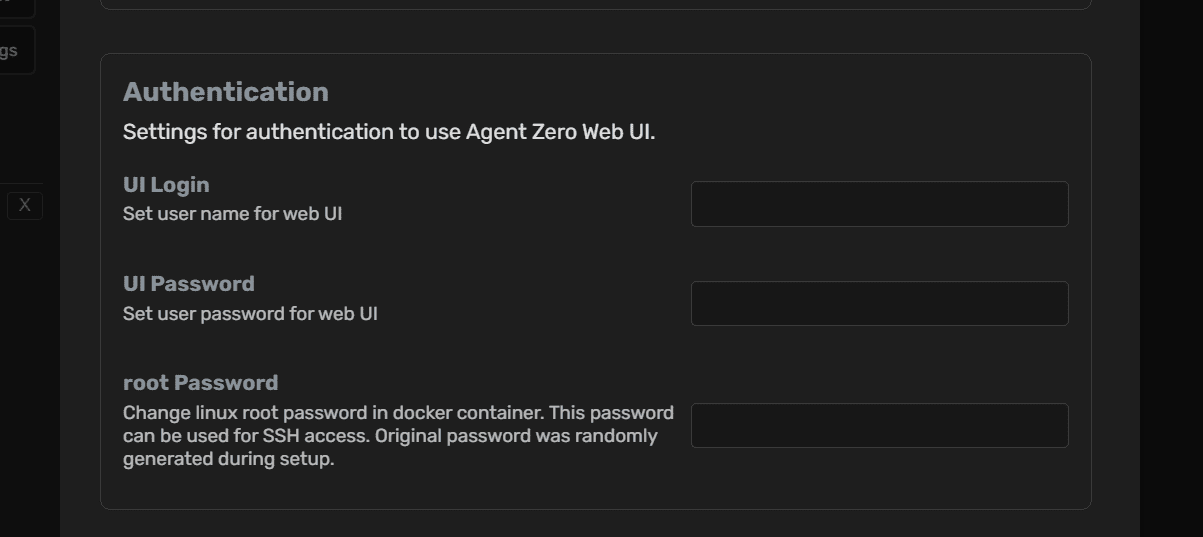
Security: Setting Up Authentication
If you plan to access Agent Zero over the internet or from multiple devices, secure your instance:
- UI Login & Password: Settings → Authentication → Set username and password for web interface access
- Root Password: Settings → Authentication → Set password for SSH access to the Docker container
After enabling authentication, you can easily share your Agent Zero instance by opening the External Services panel in the UI, scrolling to the bottom to find the Flare Tunnel section, and clicking Create Tunnel to expose it via a shareable QR code.
⚠️ Important: Always enable authentication if using Cloudflare Tunnel or exposing your instance to the internet.
Customizing Agent Behavior
Agent Zero's behavior is controlled by prompts and configurations:
See the full Usage Guide for detailed customization options.
Running Local Models with Ollama
For complete privacy, offline operation, and zero API costs, run local language models using Ollama. Note: Local models require significant additional configuration and computing resources.
Step 1: Install Ollama
Download and install Ollama on your host machine (not inside Docker):
- Windows/macOS: Download installer from ollama.com
- Linux:
curl -fsSL https://ollama.com/install.sh | sh
Step 2: Download Models
Pull the models you want to use. Popular options include:
# Recommended for chat
ollama pull llama3.2

# Smaller, faster option
ollama pull llama3.2:1b

# Larger, more capable
ollama pull llama3.1:70b
View all available models at the Ollama model library.
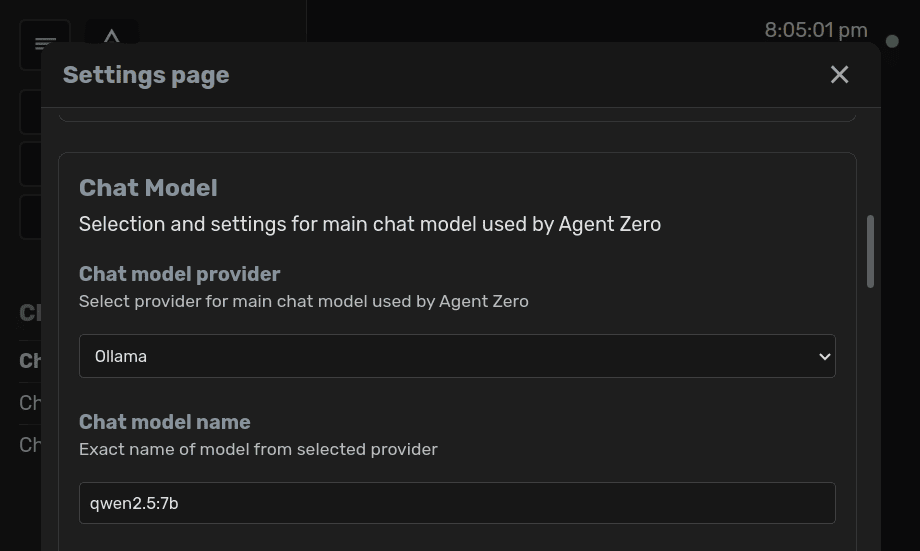
Step 3: Configure Agent Zero
- In Agent Zero, go to Settings → Agent Settings
- For Chat Model (or Utility/Embedding), select "Ollama" as the provider
- Enter the model code (e.g.,
llama3.2) - Set API base URL to
http://host.docker.internal:11434 - Save your settings
💡 Note: The URL host.docker.internal allows the Docker container to access services on your host machine.
Managing Ollama Models
# List downloaded models
ollama list

# Remove a model
ollama rm llama3.2

# Update a model
ollama pull llama3.2
⚡ Performance Tip
Local models require significant RAM and CPU/GPU resources. For best performance:
- Use models sized appropriately for your hardware (1B-7B for most users)
- Consider using a GPU if available
- Local models may be slower than cloud APIs, especially for complex tasks
Alternative: You can also use LM Studio for local models. Configuration is similar to Ollama.
Data Persistence & Backups
By default, Docker containers are ephemeral. This means that when you delete a container, all data inside is lost. This includes conversation history, memories, files created by agents, and all settings.
Option 1: Built-in Backup & Restore (Recommended)
Agent Zero includes built-in backup functionality:
- Click Settings → Backup & Restore
- Click "Create Backup" to download all data as a file
- Store the backup file safely on your computer
- When updating or recreating containers, use "Restore" to import your data
Option 2: Volume Mapping (Advanced)
Most users do not need to map any volumes, using the built-in Backup & Restore is simpler and covers typical everyday usage. Only use volume mapping if you need data to persist across container recreations, want to inspect project files directly from your machine, or want to attach a synced folder (for example a Google Drive or Dropbox folder).
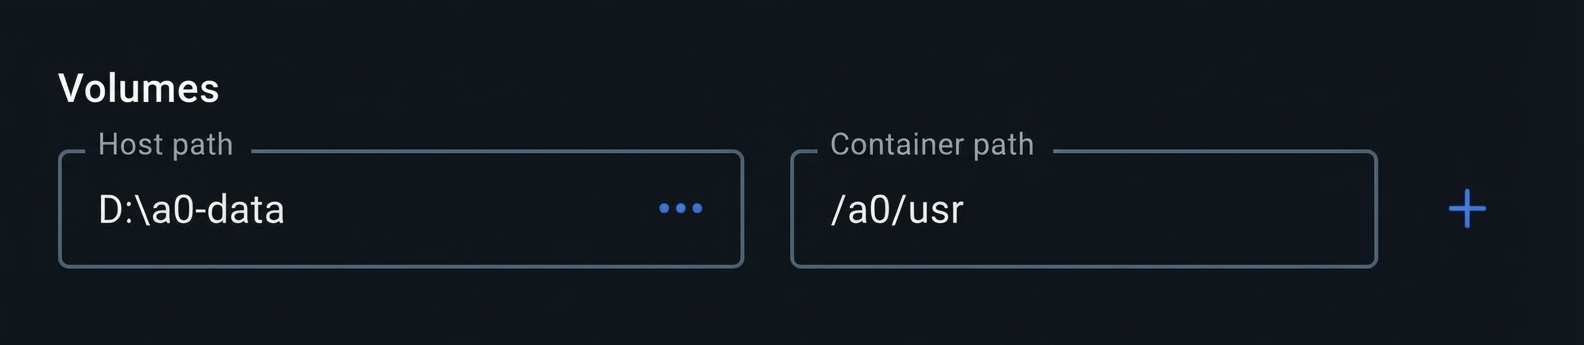
When you do need a volume, the recommended, future-proof way is to map a folder of your choice on your machine to the /a0/usr directory inside the container:
docker run -d -p 50080:80 -v /path/to/local/folder:/a0/usr --name agent-zero agent0ai/agent-zero
This keeps your projects and other user data stored under /a0/usr persistent across container restarts, while Agent Zero's internal system files remain managed by the Docker image so upgrades stay safe.
⚠️ Important Volume Mapping Notes
- Do NOT map the entire
/a0directory when upgrading. It can cause version conflicts and break your container - Avoid individually mapping internal subdirectories like
/a0/memory,/a0/knowledge, or/a0/agentsunless you know exactly what you're doing - Prefer a single mapping from a folder on your machine to
/a0/usr; this is the recommended, future-proof location for projects and user data - Even when using volumes, use the Backup & Restore feature before updates to avoid compatibility issues
What Gets Saved
Agent Zero's data includes:
/agents- Agent configurations/usr/projects- Projects/memory- Conversation history and memories/knowledge- Knowledge base files/instruments- Custom tools and instruments/prompts- Custom prompt templates/tmp/settings.json- UI settings and configurations.env- Environment variables and API keys
Updating Agent Zero
Agent Zero is actively developed with regular updates. Always backup your data before updating!
Safe Update Process (Recommended)
Keep your current Agent Zero running while setting up the new version. This ensures you can safely backup from the old instance and restore to the new one.
- Keep your current container running - Don't stop or delete it yet!
- Pull the latest image: Download the new Agent Zero version
- Run the NEW container on a different port:
docker run -d -p 50081:80 --name agent-zero-new agent0ai/agent-zero - Access your OLD instance: Go to
localhost:50080 - Create a backup: Settings → Backup & Restore → Create Backup (download the file)
- Access your NEW instance: Go to
localhost:50081 - Restore your backup: Settings → Backup & Restore → Restore (upload your backup file)
- Verify everything works: Refresh the page and check your chats, projects, and files
- Only NOW delete the old container: Your data is safely migrated!
Command Line Update Process
# Step 1: Pull the latest image (keep old container running!)
docker pull agent0ai/agent-zero:latest

# Step 2: Run NEW container on different port
docker run -d -p 50081:80 --name agent-zero-new agent0ai/agent-zero

# Step 3: Create backup from OLD instance (localhost:50080)
# Use the UI: Settings → Backup & Restore → Create Backup

# Step 4: Restore to NEW instance (localhost:50081)
# Use the UI: Settings → Backup & Restore → Restore

# Step 5: Verify your data is restored, then remove old container
docker stop agent-zero
docker rm agent-zero

# Step 6: (Optional) Rename new container and switch to original port
docker stop agent-zero-new
docker rm agent-zero-new
docker run -d -p 50080:80 --name agent-zero agent0ai/agent-zero
Why This Process?
Running both containers ensures you can always access your current data. If something goes wrong with the new version, your original Agent Zero is still running with all your data intact.
Never delete your old container until you've verified the new one has all your data!
Mobile & Network Access
Access Agent Zero from anywhere on your local network, or expose it to the internet.
Local Network Access
Access Agent Zero from phones, tablets, or other computers on your network:
- Find your computer's local IP address:
- Windows: Run
ipconfigand look for IPv4 Address - macOS/Linux: Run
ifconfigorip addr
- Windows: Run
- On your mobile device, navigate to
http://[YOUR_IP]:[PORT] - Example:
http://192.168.1.100:50080
Internet Access
To access Agent Zero from anywhere via the internet, use the built-in tunnel integration in the UI:
- In the Agent Zero UI, open Settings → External Services.
- Scroll to the bottom and find the Flare Tunnel section.
- Click Create Tunnel.
- Scan the generated QR code on your phone or share the provided URL to access your Agent Zero instance remotely.
For advanced or custom configurations, you can also use Cloudflare Tunnel directly; see the official Cloudflare Tunnel documentation.
⚠️ Security warning: Always enable authentication (UI login/password) before exposing to the internet!
Need Help?
Running into issues? Reach out to the community!
Community Support
Get help from the community and developers in real-time.